Does your garage door opener motor hum or run but the door stays stubbornly in place? You’re likely dealing with a stripped drive gear—one of the most common garage door opener failures. The good news? For many chain and belt drive systems, gear replacement is a manageable DIY repair that can save you hundreds of dollars and extend your opener’s life by years.
In this comprehensive guide, we’ll walk you through everything you need to know about garage door opener gear replacement, from diagnosing the problem to completing the repair safely. Whether you’re a confident DIYer or trying to decide if professional service makes more sense, this guide has you covered.
What Does the Garage Door Opener Gear Do?
Understanding how your garage door opener works helps you diagnose problems more accurately. Inside most residential openers sits a critical component: the main drive gear, typically made from white or cream-colored plastic.
Here’s how the system works:
- The motor spins a metal worm gear attached to its shaft
- The worm gear engages teeth on the main plastic drive gear
- The drive gear rotates the sprocket (chain drive) or pulley (belt drive)
- The chain or belt moves the trolley along the rail
- The trolley lifts or lowers your garage door
The plastic gear is intentionally designed as a “sacrificial component.” When your opener experiences excessive strain—from an unbalanced door, tight chain tension, or simple age—the plastic gear strips instead of burning out the more expensive motor. It’s a clever engineering solution that protects your investment, though it does mean eventual replacement is necessary.
Clear Signs You Need a Garage Door Opener Gear Replacement
Recognizing gear failure early prevents further damage and saves you from being stuck with a non-functional door. Watch for these telltale symptoms:
1. Motor Runs But Door Doesn’t Move
This is the classic sign of a stripped gear. You’ll hear the motor humming or running normally, but the chain or belt remains stationary. The motor shaft spins, but the failed gear can’t transfer that motion to the drive mechanism.
2. Grinding or Crunching Noises
When plastic gear teeth begin stripping, they create a distinctive grinding sound during operation. You might also hear intermittent crunching as remaining teeth catch and slip. These noises often start sporadically and worsen over weeks or months.
3. White Plastic Debris Inside the Housing
If you open the opener’s cover and find white or cream plastic shavings scattered around the gear assembly, your drive gear is definitely stripped. This debris is the broken-off teeth from the failed gear.
4. Intermittent or Jerky Movement
In early failure stages, you might notice the door moving in fits and starts, or only traveling partway before stopping. This happens when some gear teeth remain intact while others have stripped away. Understanding these early warning signs can help you avoid being caught off guard—similar to recognizing common garage door opener problems before they become emergencies.
Why Do Garage Door Opener Gears Fail?
Understanding failure causes helps you prevent repeat problems after replacement. Several factors accelerate gear wear:
Unbalanced Garage Door
This is the number one cause of premature gear failure. When your door’s springs can’t properly counterbalance its weight, the opener motor works overtime on every cycle. This constant strain rapidly wears the plastic gear teeth. Before replacing your gear, always test door balance by disconnecting the trolley and manually lifting the door halfway—it should stay in place with minimal effort. If it doesn’t, you have a spring tension problem that needs addressing first. Learning how to balance a garage door is essential before attempting gear replacement to prevent recurring failures.
Excessive Chain Tension
Chain drive openers require proper tension—too tight and the motor strains unnecessarily. The chain should have about ½ inch of slack at its midpoint when properly adjusted. Over-tightening creates resistance that puts constant stress on the drive gear.
Age and Wear
Even with perfect balance and maintenance, plastic gears eventually wear out. Most last 10-15 years or 10,000-15,000 cycles. High-use households (4+ cycles daily) may see failure sooner.
Lack of Lubrication
The gear assembly requires regular lubrication to reduce friction and heat. When old grease dries out or was never applied adequately during manufacturing, friction increases and accelerates wear.
Manufacturing Defects
Some opener models from certain years had known gear quality issues. If your opener is relatively new (under 5 years) and experiencing gear failure, check with the manufacturer about recalls or known problems with your model.
Can You Replace a Garage Door Opener Gear Yourself?
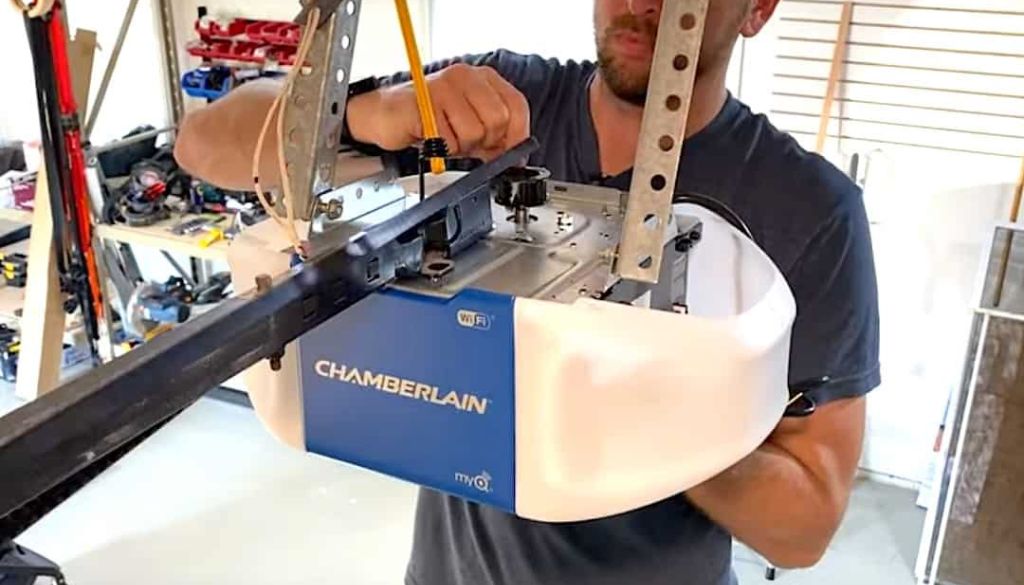
For most chain and belt drive openers (LiftMaster, Chamberlain, Craftsman, Genie, Wayne Dalton), gear replacement is within reach of confident DIYers. However, assess your situation honestly:
Good candidates for DIY gear replacement:
- Comfortable using hand tools
- Can follow detailed instructions carefully
- Understand basic electrical safety
- Have 2-3 hours available
- Opener is a standard chain or belt drive model
Should call a professional instead if:
- Opener is a newer DC motor or smart model
- You’re uncomfortable working with electricity
- Door balance issues exist
- Multiple opener components have failed
- Opener is 15+ years old (replacement might be smarter)
Tools and Materials You’ll Need
Before starting, gather everything you’ll need. Having tools ready prevents frustration mid-project.
Essential Tools:
- 1/4″, 5/16″, and 3/8″ nut drivers or socket set
- Adjustable wrench (½ inch)
- Flathead screwdriver
- Small hammer
- Metal punch (for driving out roll pins)
- White lithium grease or manufacturer-specified lubricant
- C-clamps or locking pliers
- Work gloves and safety glasses
Materials:
- Replacement gear kit (model-specific—verify your opener’s model number)
- Shop rags or paper towels
- Container for small parts
Gear kit options: You can purchase either a basic gear-only kit ($20-$40) or a complete assembly kit ($60-$150) that includes the sprocket or pulley, shaft, and all gears. Complete kits are easier for beginners since they eliminate the need to drive out roll pins and transfer components.
Step-by-Step Garage Door Opener Gear Replacement
Follow these steps carefully and work methodically. Rushing leads to mistakes, stripped screws, and frustration.
Safety First: Critical Precautions
Before touching anything:
- Unplug the opener completely from the electrical outlet
- Pull the emergency release cord to disconnect the trolley from the door
- Ensure the garage door is fully closed
- Clamp the door to the track using C-clamps on both sides above a roller to prevent movement
- Never work under a suspended door that isn’t secured
Step 1: Disconnect Power and Secure the Door
Safety cannot be overstated—garage doors are heavy (150-400 pounds) and can cause serious injury. With the door fully closed, use C-clamps or locking pliers to secure it to the tracks on both sides. This prevents it from moving while you work on the disconnected opener.
Step 2: Release Chain or Belt Tension
Locate the tensioning mechanism on your trolley assembly—this is usually a threaded shaft with a locking nut. Using an adjustable wrench, loosen this nut to create slack in the chain or belt. For chain drives, you’ll need significant slack to remove the chain from the sprocket. Belt drives require less tension release.
Step 3: Mark and Remove Chain or Belt
Before removing the chain or belt from the sprocket, mark its position with a permanent marker or take a clear photo. This makes reinstallation much easier and ensures proper alignment. Carefully work the chain or belt off the sprocket teeth.
Step 4: Remove the Opener Housing Cover
Most opener covers are held by 4-8 screws around the perimeter. Remove these screws and carefully lift the cover, watching for any quick-disconnect wiring that might be attached. Some covers have wire terminals for lights—gently disconnect these before fully removing the cover. Set screws in a container so they don’t roll away.
Step 5: Remove Limit Switch and RPM Sensor
These components typically attach to the gear assembly housing. Remove mounting screws carefully without adjusting the limit switch settings—if you turn the adjustment screws, you’ll need to recalibrate your door’s travel limits later. Set these components aside safely.
Step 6: Remove the Motor Assembly
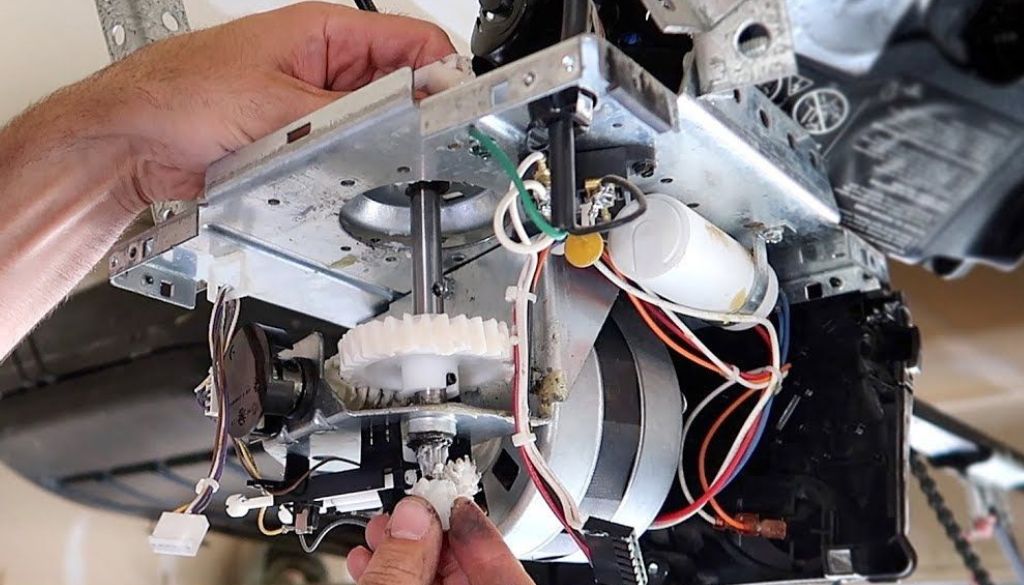
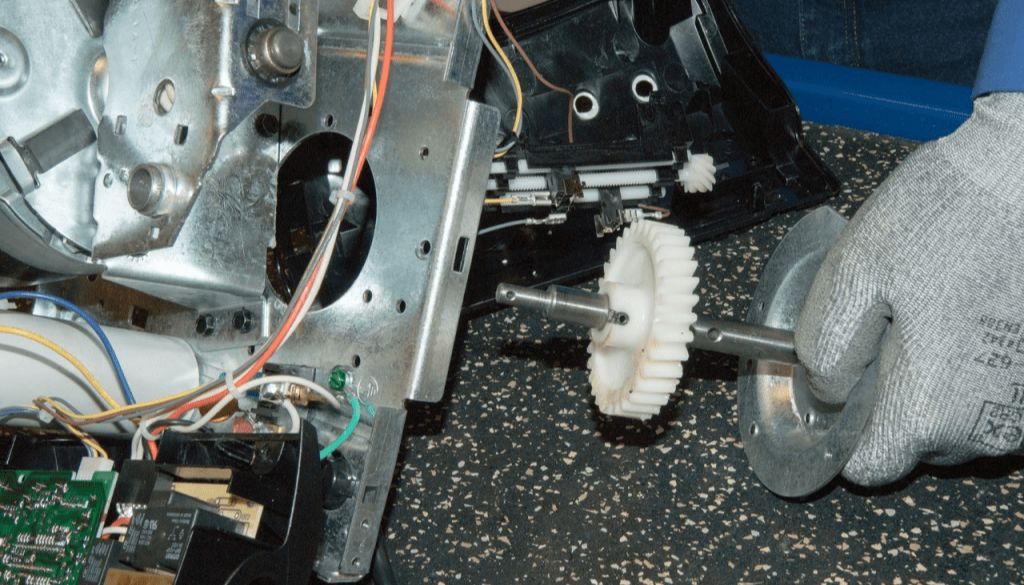
The motor usually mounts to the main gear housing with 3-4 bolts. Support the motor’s weight as you remove the last bolt—it’s heavier than you might expect. Once free, carefully slide the motor and worm gear off the drive shaft. Inspect the worm gear for wear; if it’s damaged, you’ll need to replace it as well.
Step 7: Remove the Old Drive Gear
If you’re using a complete assembly kit, simply unbolt the old assembly and replace it entirely. If you’re replacing only the gear, you’ll need to:
- Use a punch and hammer to drive out the roll pin securing the gear to the shaft
- Slide the old gear off
- Clean the shaft thoroughly
- Apply fresh grease to the shaft
Step 8: Install the New Gear and Lubricate
This is where many DIYers make critical mistakes. Proper lubrication is essential for long gear life. Apply white lithium grease generously to:
- All gear teeth (both main gear and worm gear)
- The drive shaft
- Contact surfaces between components
Don’t be stingy—the gear needs adequate lubrication to survive thousands of cycles. However, avoid getting grease on the motor shaft or bearings.
Step 9: Reassemble the Drive Assembly
Reverse your disassembly steps carefully:
- Secure the new gear with the roll pin (if applicable)
- Reinstall the motor assembly, ensuring the worm gear properly meshes with the main gear
- Reattach the RPM sensor and limit switch assembly
- Reconnect any electrical connectors
- Replace the housing cover
Step 10: Reinstall Chain or Belt
With the trolley in the fully retracted (door-closed) position, reinstall the chain or belt onto the sprocket. Refer to your earlier markings or photo to ensure proper positioning. For chain drives, there’s usually a master link that must align correctly.
Step 11: Adjust Chain or Belt Tension
Proper tension is crucial for smooth operation and gear longevity:
Chain drive: The chain should have approximately ½ inch of slack at the midpoint when measured from the bottom of the rail. Too tight and you’ll strain the new gear; too loose and the chain will slap the rail noisily.
Belt drive: Belts require less slack—typically ¼ inch at the midpoint. Check your owner’s manual for model-specific recommendations.
Tighten the tensioning nut while holding the adjustment bolt steady, then recheck the tension.
Step 12: Test and Adjust
Remove the door clamps and reconnect power. Before reattaching the trolley to the door:
- Run the opener through several complete cycles
- Listen for unusual noises
- Verify smooth operation
- Check that the trolley travels the full rail length
Once you’re satisfied the opener operates smoothly, reconnect the trolley to the door and test with the actual door weight. You may need to adjust travel limits and force settings—consult your owner’s manual for specific procedures.
Important: Avoid running more than 8-10 consecutive cycles without rest periods, as this can overheat the motor.
When Replacement Makes More Financial Sense
Sometimes repairing isn’t the smartest choice. Consider replacing your entire opener if:
Age factors:
- Unit is 12-15+ years old
- Opener predates modern safety standards
- Parts are becoming difficult to source
Multiple failures:
- Circuit board has failed or shows signs of damage
- Safety sensors malfunction frequently
- Motor makes excessive noise even after gear replacement
- You’ve already completed multiple major repairs
Cost considerations:
- Professional gear replacement costs $180-$350
- New basic opener costs $200-$400 installed
- If repair costs exceed 50% of replacement, upgrade instead
Modern advantages of new openers:
- WiFi connectivity and smartphone control
- Battery backup during power outages
- Quieter DC motors (often 50% quieter)
- Enhanced safety features
- Better warranty coverage
Understanding how long garage door openers last helps you make informed decisions about repair versus replacement.
Chain Drive vs Belt Drive: Key Differences
| Feature | Chain Drive | Belt Drive |
|---|---|---|
| Noise Level | Louder operation | Quieter (50% reduction) |
| Gear Type | Sprocket with teeth | Smooth pulley system |
| Durability | Very durable, metal chain | Rubber belt wears faster |
| Replacement Complexity | Moderate | Moderate |
| Common Failure | Stripped main gear | Stripped main gear |
| Best For | Detached garages | Attached garages near bedrooms |
| Cost | Less expensive | 10-20% more expensive |
Despite drive type differences, the internal plastic drive gear is essentially the same component in both systems and fails for the same reasons.
Preventing Future Gear Failure
After investing time and effort in gear replacement, protect your work with proper maintenance:
Every 2-3 years:
- Apply fresh white lithium grease to gear assembly
- Inspect gear teeth for early wear signs
- Check worm gear for damage
Every 6 months:
- Verify proper chain or belt tension
- Test door balance (should stay in place at halfway point)
- Lubricate chain, rollers, and hinges
Annually:
- Professional inspection of spring tension and door balance
- Replace worn springs before they fail completely
- Check all safety features (sensors, auto-reverse, etc.)
Regular garage door maintenance prevents most opener problems and significantly extends component life.
Common Mistakes to Avoid
Learn from others’ errors and save yourself frustration:
- Forgetting to unplug the opener — This risks electric shock and accidental activation
- Not securing the door — A falling door can cause serious injury
- Adjusting limit switch screws unnecessarily — You’ll spend hours recalibrating travel limits
- Over-tightening the chain — This is a leading cause of repeat gear failure
- Skimping on lubrication — Insufficient grease causes premature wear
- Ignoring door balance issues — The new gear will fail just as quickly as the old one
- Cycling the opener excessively during testing — This can overheat the motor
- Mixing up quick-disconnect wiring — Take photos before disconnecting anything
When to Call Impact Doors
While gear replacement can be a successful DIY project, some situations absolutely require professional expertise:
Call us immediately if:
- Your door is severely out of balance or springs are broken
- You smell burning or see scorch marks on components
- The motor capacitor is bulging or leaking
- You suspect multiple component failures
- Your opener is a newer smart/DC motor model
- You’re uncomfortable working with electrical components
- The repair is taking much longer than expected
At Impact Doors, we’ve replaced thousands of garage door opener gears across Moreton Bay and North Brisbane. Our experienced technicians can complete the job in about an hour, including:
- Complete diagnosis of the failure cause
- Door balance check and spring tension adjustment
- Gear replacement with proper lubrication
- Full system testing and calibration
- Warranty on parts and labor
Don’t let a stripped gear disrupt your daily routine. Call Jarred and the Impact Doors team at (07) 5451 4022 or visit our office at 427 Uhlmann Road, Burpengary East QLD 4505.
We offer same-day service for most repairs and carry common parts on our service vehicles. With over 150 five-star reviews from satisfied customers, you can trust us to get your garage door working reliably again. For complex issues that go beyond simple gear replacement, our team provides comprehensive garage door troubleshooting services.
Frequently Asked Questions
How long do garage door opener gears typically last?
With proper maintenance and a balanced door, most garage door opener gears last 10-15 years or 10,000-15,000 cycles. High-use households (4+ cycles daily) may experience failure sooner, while occasional-use openers can last 20+ years. The key factor is door balance—an unbalanced door can strip a new gear in months.
Why is the drive gear made of plastic instead of metal?
The plastic gear is an intentional “weak link” design feature. When excessive load occurs—from an unbalanced door, obstruction, or mechanical failure—the plastic gear strips instead of burning out the more expensive motor. It’s cheaper and easier to replace a $30 gear than a $150 motor. This design actually protects your investment.
Can a stripped gear damage the motor?
Not usually, if you stop using the opener once you notice the problem. The stripped gear prevents the motor from transferring force to the drive mechanism, so the motor just spins freely without load. However, if you continue trying to operate the opener repeatedly, the motor can overheat from running continuously without moving the door, potentially causing motor damage.
Will my new gear last longer than the original?
Yes, if you address the underlying causes of the original failure. Most importantly, ensure your door is properly balanced before installing the new gear. Additionally, use generous lubrication, maintain proper chain tension, and avoid excessive cycling. Many DIYers report their replacement gears outlasting the originals because they’re more attentive to maintenance after experiencing a failure.
Is DIY gear replacement dangerous?
The gear replacement process itself involves low-voltage components and isn’t particularly dangerous if you follow proper procedures. The main risks come from: (1) working on a plugged-in opener (always unplug it), (2) not securing the door properly (use C-clamps), and (3) attempting spring repairs without training (leave springs to professionals). If you’re methodical and safety-conscious, gear replacement is a manageable DIY task.
Should I replace just the gear or buy a complete kit?
For first-time DIYers, complete assembly kits ($60-$150) are often worth the extra cost. They eliminate the tricky process of driving out roll pins and transferring components, typically cutting repair time in half. If you have experience and proper tools, gear-only kits ($20-$40) save money. Consider the complete kit if the sprocket teeth show wear or if you want the fastest possible installation.
Take Action Today
A stripped garage door opener gear doesn’t have to mean days without garage access or a expensive new opener. With the right approach—whether DIY or professional service—you can have your opener working smoothly again quickly and affordably.
For DIY enthusiasts: Follow this guide carefully, don’t rush, and prioritize safety above speed. Address door balance issues first, use quality parts, and apply generous lubrication.
For everyone else: Contact Impact Doors for fast, professional garage door opener repair service throughout Moreton Bay and North Brisbane. We’re available 24/7 for emergencies and offer same-day appointments for most service requests.
Call (07) 5451 4022 now or visit impactdoors.net.au to schedule service or request a free quote.
Impact Doors has been serving Moreton Bay and North Brisbane homeowners since 2016 with expert garage door repair, installation, and maintenance services. Owner Jarred Turner and his experienced team work with all major brands including B&D, Best Doors, Stoddart, Centurion, Steel-Line, and Dynamic. We’re available 24/7 for emergency repairs and pride ourselves on same-day service, transparent pricing, and the 150+ five-star reviews from satisfied customers across the region. Whether you need a simple gear replacement or complete system upgrade, Impact Doors delivers quality workmanship and reliable service you can trust.