Your garage door feels heavier than usual. It jerks during operation or won’t stay open at the halfway point. These symptoms often point to one culprit: springs that need adjustment. For homeowners with side-mounted extension springs, understanding the adjustment process can save both money and frustration—provided you approach the task with proper respect for the risks involved.
This guide walks you through adjusting side-mounted garage door springs safely, identifying when adjustment is needed versus replacement, and recognising when professional help is the smarter choice.
Understanding Side-Mounted Spring Systems
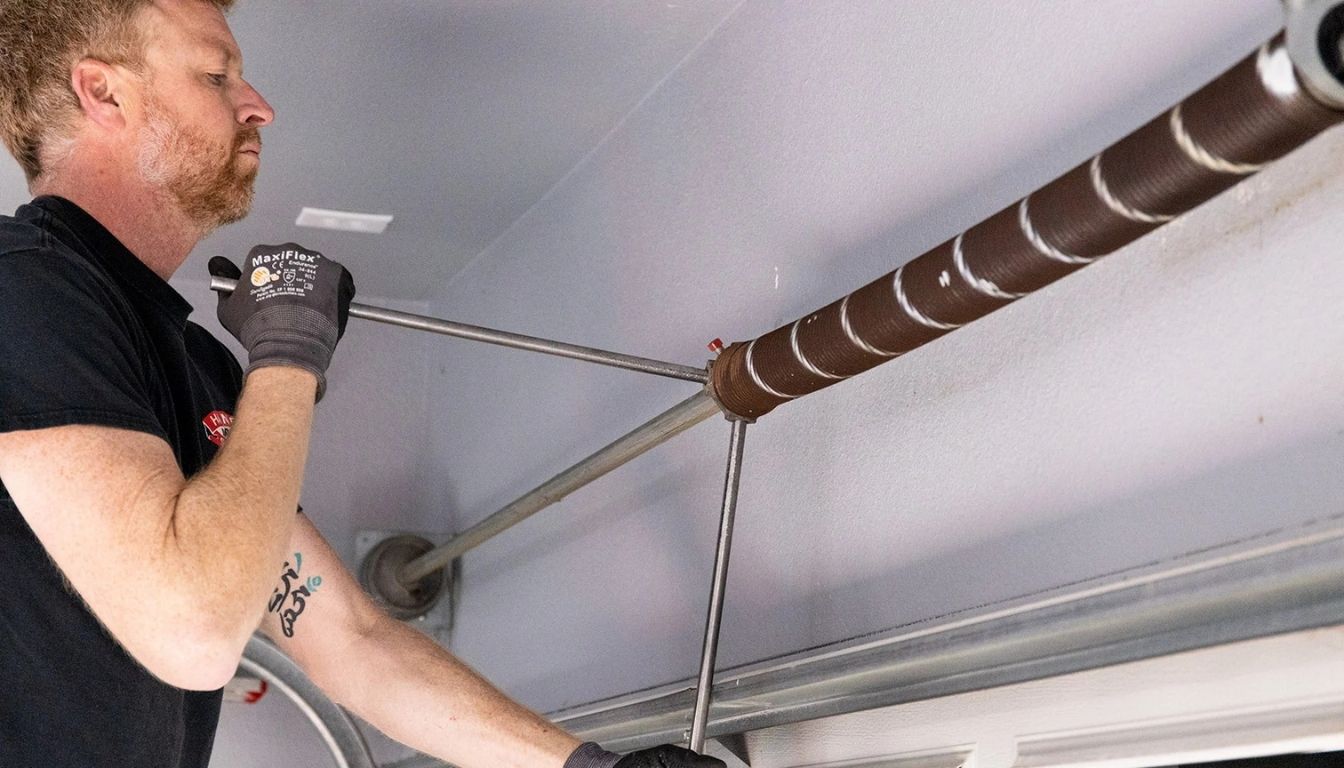
Garage doors use springs to counterbalance their weight, making a 70 to 150-kilogram door feel nearly weightless during operation. Side-mounted springs—typically extension springs—run parallel to the horizontal tracks on either side of the door opening. They stretch when the door closes and contract when it opens, providing the lifting force your opener relies on.
This differs from torsion springs, which mount horizontally above the door and twist to store energy. While torsion systems are common in newer Australian homes, many older properties and certain door configurations still use side-mounted extension springs.
Extension springs are generally considered more DIY-accessible than torsion springs, but they still operate under significant tension. A spring rated for a 90-kilogram door stores enough energy to cause serious injury if released uncontrolled. Because extension springs are not one-size-fits-all, reviewing whether garage door springs are universal helps ensure proper compatibility during adjustment.
Signs Your Side-Mounted Springs Need Adjustment
Before grabbing tools, confirm that spring adjustment will actually solve your problem. These symptoms typically indicate tension issues. Side mounted systems typically rely on extension springs, so understanding the differences between extension and torsion springs is essential before making adjustments.
The door feels heavy when lifting manually. Disconnect your opener and lift the door by hand. A properly balanced door should feel light—almost weightless—and stay in place when released at any point along its travel. If it feels heavy or drops when released, spring tension is likely too low.
The door won’t stay open. A balanced door should remain stationary when stopped halfway. If it drifts downward, the springs aren’t providing enough counterforce. If it shoots upward, they’re over-tensioned.
Uneven movement or tilting. When one spring loses tension faster than the other, the door may travel crookedly or bind against the tracks. This uneven wear is common in older systems.
Your opener strains or stops mid-cycle. Modern openers include safety features that halt operation when resistance exceeds normal parameters. An under-tensioned spring system forces the opener to work harder, triggering these safety stops.
Loud creaking or popping sounds. While some noise is normal, excessive creaking during operation often indicates springs struggling under improper tension or requiring lubrication.
Safety First: The Risks of Spring Adjustment
Extension springs are safer to work with than torsion springs, but “safer” doesn’t mean “safe.” These components store substantial mechanical energy, and mistakes during adjustment can result in serious injuries including lacerations, broken bones, and eye damage. If the spring is stretched, cracked, or broken, follow this guide on how to replace a damaged garage door spring before attempting to adjust side mounted tension.
Critical safety rules:
Never work on springs with the door in the open position. Open doors place maximum tension on extension springs—exactly when you don’t want to be adjusting them. Always work with the door fully closed.
Ensure safety cables are installed. Safety cables thread through extension springs and anchor to the track or wall. If a spring breaks, the cable prevents it from becoming a projectile. If your system lacks safety cables, install them before any other work.
Wear proper protective equipment. Safety glasses protect against flying debris and sudden cable snap. Heavy work gloves protect your hands from sharp edges and pinch points.
Work with a partner when possible. Having someone nearby in case of emergency is basic workshop safety—especially when working with tensioned components.
When to Call a Professional
Some situations warrant professional expertise regardless of your DIY confidence:
- Springs show visible damage, rust, or gaps between coils
- You’re uncertain about spring type, size, or proper tension specifications
- The door is a double-width or unusually heavy model
- Previous adjustment attempts haven’t resolved the problem
- Safety cables are missing or damaged
For homeowners across Moreton Bay and North Brisbane, Impact Doors provides spring assessment and adjustment services. Their technicians can often identify underlying issues that DIY inspection might miss.
Tools and Equipment Required
Gather everything before starting. Stopping mid-job to find a tool creates unnecessary risk.
Essential tools:
- Adjustable wrench or socket set
- C-clamps or locking pliers (minimum 2)
- Step ladder rated for your weight
- Safety glasses
- Heavy-duty work gloves
- Garage door lubricant (silicone or lithium-based)
- Tape measure
- Marker or tape for reference points
Helpful additions:
- Headlamp or work light for visibility
- Spring scale (for measuring door weight if needed)
- Replacement S-hooks or adjustment clips (in case existing hardware is worn)
Step-by-Step Adjustment Process
Step 1: Disconnect the Opener and Secure the Door
Pull the emergency release cord to disengage the opener trolley from the door. This allows manual operation and prevents accidental activation during your work.
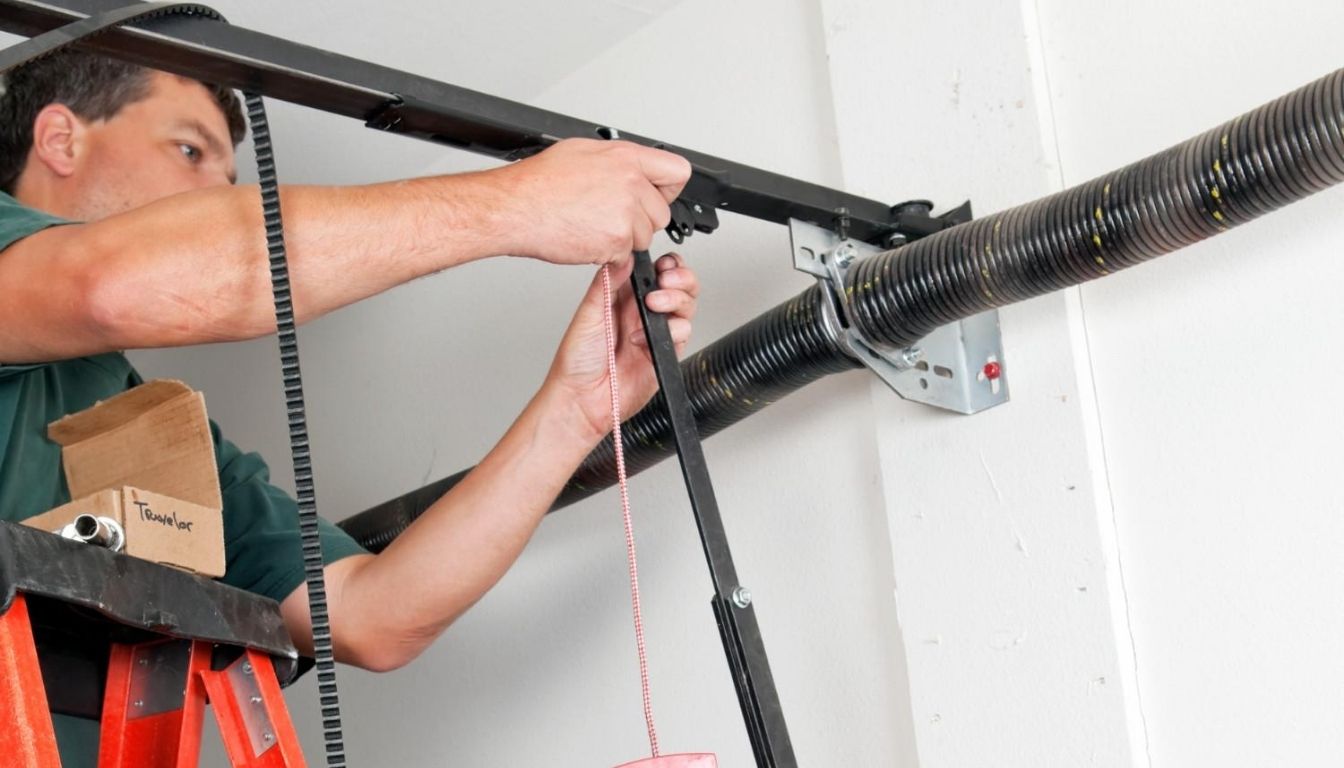
Close the door completely. Clamp locking pliers or C-clamps onto the track just above one of the bottom rollers on each side. This prevents the door from moving unexpectedly and provides a safety backup.
Step 2: Locate and Assess the Springs
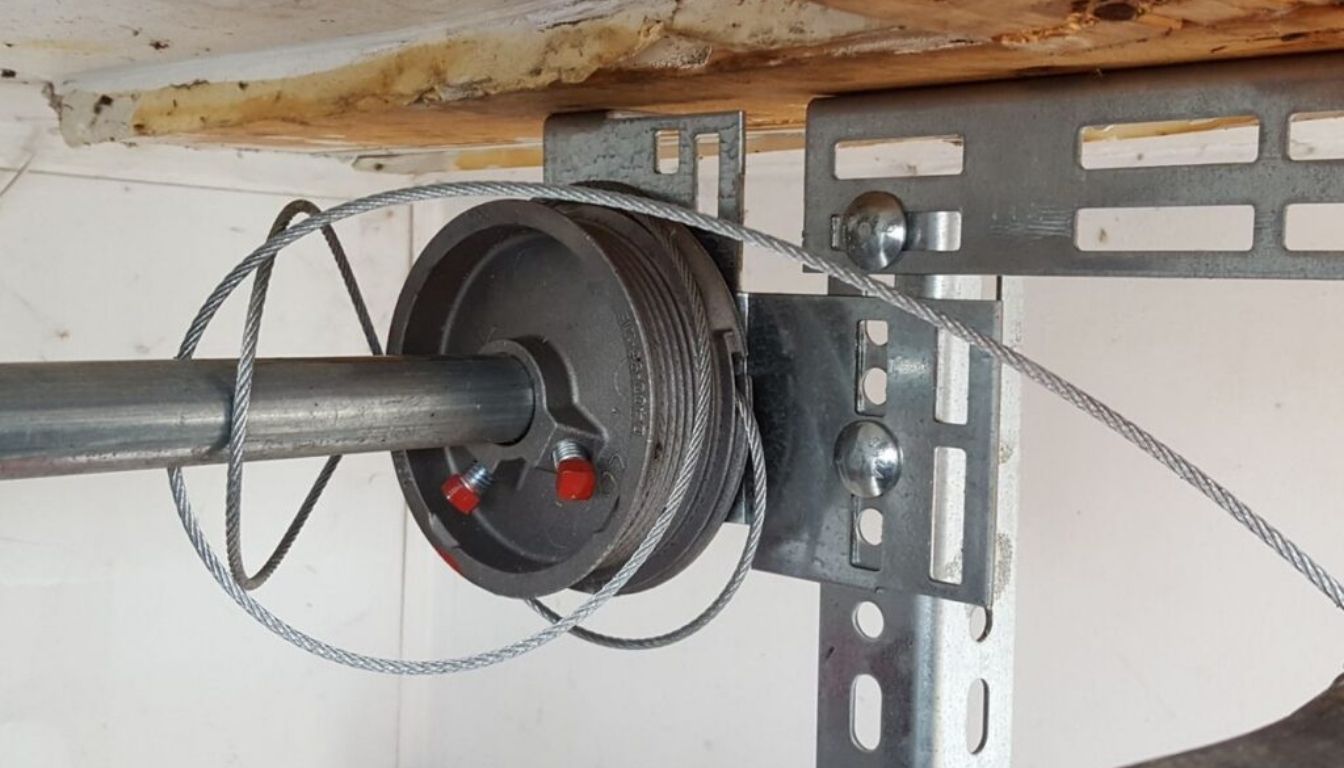
Extension springs attach at the rear of the horizontal track and connect to the door via a cable and pulley system. Follow the cable from the bottom bracket of the door, over the pulley, and back to where it connects to the spring.
Note the current attachment point of the spring. Most extension springs connect to the track bracket via an S-hook or threaded adjustment rod. The hook position determines spring tension—moving it to a hole closer to the door increases tension; moving it away decreases tension.
Step 3: Adjust Spring Tension
Here’s where extension springs differ from torsion systems. Instead of winding bars and quarter-turns, extension spring adjustment typically involves repositioning the S-hook or adjusting a threaded rod.
For S-hook systems: With the door closed (relieving spring tension), carefully unhook the S-hook from its current position. Move it to an adjacent hole—one hole at a time. Closer to the door increases tension; farther away decreases it.
For threaded adjustment systems: Loosen the lock nut, turn the adjustment bolt to increase or decrease tension, then re-tighten the lock nut.
Always adjust both springs equally. Uneven tension causes tracking problems and accelerates wear on the unbalanced side.
Step 4: Test and Fine-Tune
Remove the C-clamps from the tracks. Manually lift the door to waist height and release it. A properly balanced door stays in place, neither rising nor falling.
If the door drifts down, increase tension slightly on both springs. If it rises, decrease tension. Make adjustments in small increments—one hole position or a quarter-turn on threaded systems—and retest after each change.
Once balanced, cycle the door through several complete open-close operations to verify smooth travel. Listen for unusual sounds and watch for binding or jerky movement.
Step 5: Lubricate and Reconnect
Apply garage door lubricant to the springs, pulleys, and roller bearings. Avoid WD-40—it’s a solvent that can actually strip existing lubrication. Use silicone or lithium-based products designed for garage doors.
Re-engage the opener by pulling the emergency release cord toward the opener and cycling the door with the remote or wall button. Test both manual and automatic operation.
Troubleshooting After Adjustment
Door still feels unbalanced: You may need further adjustment, or the springs themselves may be worn beyond correction. Springs lose tension over their lifespan—adjustment can only compensate so much.
Cables appear slack or have jumped off pulleys: This often indicates more significant problems with cable length, drum alignment, or spring tension. Re-routing cables requires careful attention to proper seating in pulleys and drums.
Opener continues straining: If adjustment hasn’t resolved opener strain, the issue may lie with the opener itself, track alignment, or worn rollers rather than the springs. Once adjustments are complete, fine-tuning a newly installed garage door helps maintain proper balance and smooth operation.
When to Replace Instead of Adjust
Adjustment has limits. Replace springs when you observe:
- Visible gaps between coils indicating metal fatigue
- Heavy rust or corrosion weakening the spring material
- One spring has already broken (always replace in pairs)
- Springs are more than 10 years old and showing wear
- Multiple adjustment attempts haven’t achieved proper balance
Replacement springs must match your door’s weight and dimensions. Incorrect springs create the same problems you’re trying to solve—or worse.
Frequently Asked Questions
How often do garage door springs need adjusting?
Most properly installed springs require minimal adjustment over their lifespan. If you’re adjusting frequently—more than once per year—the springs may be incorrectly sized or approaching failure. Correct tension depends on accurate sizing, which is why knowing what size garage door spring you need is essential before adjusting side mounted springs.
Can I adjust just one spring?
While technically possible, adjusting only one spring creates uneven tension that causes tracking problems and accelerates wear. Always adjust both springs equally.
How do I know if springs are too tight or too loose?
Perform the balance test: disconnect the opener, lift the door halfway, and release. If it falls, springs are too loose. If it rises, they’re too tight. A balanced door stays put.
Is adjusting springs dangerous?
Extension springs are less dangerous than torsion springs but still demand respect. Working with the door closed, wearing protective equipment, and ensuring safety cables are installed minimises risk significantly.
Maintenance to Prevent Future Issues
Lubricate springs, pulleys, and hinges every six months. Perform a visual inspection quarterly, checking for rust, fraying cables, and worn hardware. Test door balance seasonally—catching minor imbalances early prevents major problems later.
When Professional Help Makes Sense
DIY adjustment suits confident homeowners with the right tools and patience. But there’s no shame in recognising when a job exceeds your comfort level. Improperly adjusted springs create ongoing problems and potential safety hazards.
For professional spring adjustment, inspection, or replacement across Moreton Bay and North Brisbane, Impact Doors offers same-day service in most areas. Their technicians work with all spring types and can diagnose issues that might not be obvious to homeowners. Call (07) 5451 4022 or visit impactdoors.net.au to book an assessment.